Dec 29

Have you ever looked through your server logs and seen something like this?

[MY-013360] [Server] Plugin mysql_native_password reported: ”mysql_native_password’ is deprecated and will be removed in a future release. Please use caching_sha2_password instead’

This is because, as you can see in the MySQL 8.1.0 release notes, the plugin is now deprecated.

Luckily, the warning also tells you the solution – switch to caching_sha2_password instead. However it doesn’t tell you how to do that.

This needs to be done on a per-user basis, and you also need to know the password of the user. To find out which users to update, run the following SQL:

SELECT user, host, plugin FROM mysql.user;

(Note, you can enter a SQL console on the host machine with something like mysql -u root -p)

This will give you an output something like this:

mysql> SELECT user, host, plugin FROM mysql.user ORDER BY user;
+------------------+--------------+-----------------------+
| user             | host         | plugin                |
+------------------+--------------+-----------------------+
| debian-sys-maint | localhost    | mysql_native_password |
| example_user     | localhost    | mysql_native_password |
| mysql.infoschema | localhost    | caching_sha2_password |
| mysql.session    | localhost    | mysql_native_password |
| mysql.sys        | localhost    | caching_sha2_password |
| mysqld_exporter  | localhost    | mysql_native_password |
| root             | localhost    | mysql_native_password |
+------------------+--------------+-----------------------+

As you can see, some users are configured with the mysql_native_password plugin. All we need to do is alter the users and update them to caching_sha2_password.

Here’s an example:

ALTER USER 'mysqld_exporter'@'localhost' IDENTIFIED WITH caching_sha2_password BY 'StrongPassword';

You might want to FLUSH PRIVILEGES; once you’re done.

Tagged with:
Nov 04

Time Machine automatically deletes old backups when it’s getting full, but if you also use the backup disk for other purposes, you might want to clear some space manually.

There is a built-in command line utility that comes with macOS which you can use for this – tmutil.

Specifically, the sub-command you want is tmutil delete, here is an extract from the man page:

     delete [-d backup_mount_point -t timestamp] [-p path]
             Deletes the backups with the specified timestamp from the backup volume mounted at the specified
             mountpoint. The -t option followed by a timestamp can be used multiple times to specify multiple backups
             to delete. For HFS backup disks, a specific path to delete can also be specified using the -p option.
             This verb can delete items from backups that were not made by, or are not claimed by, the current
             machine. Requires root and Full Disk Access privileges.

You can list existing backups with tmutil listbackups but the path that’s printed is not the path you need to provide to tmutil delete. In fact, you actually need to provide the -d and -t flags, not -p.

To find the backup mount point, you can use tmutil destinationinfo. Here is an example output:

~ $ tmutil destinationinfo                                                                                     
====================================================
Name          : Time Machine
Kind          : Local
Mount Point   : /Volumes/Time Machine
ID            : F0CBBC01-DEAD-CA1F-BEEF-0000AAAABBBB

So in this case, the value for the -d flag is "/Volumes/Time Machine".

You can extract this with awk or another utility, for example:

~ $ tmutil destinationinfo | awk -F ' : ' '/Mount Point/{print $2}'                                            
/Volumes/Time Machine

As for the -t (timestamp) flag, this is obvious from the tmutil listbackups output, but you can even specify -t in the listbackups sub-command which prints only the value needed in the correct format.

For example:

~ $ tmutil listbackups -t
2022-02-05-094839
2022-02-12-091416
2022-02-19-093000
2022-02-26-092448
...

Bringing it all together

Now we know what values to pass to tmutil delete, the final command might look like this:

sudo tmutil delete -d "/Volumes/Time Machine" -t 2022-02-05-094839

But we can go one better than this… Say you want to delete all the backups from Jan-Mar in 2023, you can use this one-liner:

tmutil listbackups -t | \
egrep '2023-0[123]' | \
xargs -L 1 sudo tmutil delete \
-d "$(tmutil destinationinfo | awk -F ' : ' '/Mount Point/{print $2}')" -t

Of course you could filter in other ways, e.g. head -n 20 to delete the oldest 20 backups (careful though, this will delete the most recent as well if there are only 20 or fewer in total).

Tagged with:
Dec 31

Almost a year ago, I published a blog post benchmarking my ADATA SSD in an external caddy with a JHL6340 chip. I thought it’d be fun re-benchmark and see if anything has degraded over time.

Blackmagic – JHL6340 Thunderbolt


Write: 1232.5MB/s, Read: 1415.5MB/s

Amorphous – JHL6340 Thunderbolt

Write: 1354.14MB/s, Read: 1555.70MB/s

Interestingly, the Blackmagic with speed has increased considerably (to be more in line with Amorphous). Other than that, the results have remained pretty similar to last year. Happy days!

Jan 03

As mentioned in my pervious post, I recently got an M1 Mac mini with an external NVMe disk for additional storage. In that post, I said Thunderbolt (as opposed to USB 3.1) enclosures are prohibitively expensive. While they are certainly more expensive, there are some out there at a reasonable price.

I got my hands on one (with a JHL6340 chip) and did a speed test to compare it with USB.

Blackmagic – ASM2362 USB 3.1

Write: 825.8MB/s, Read: 819.9MB/s

Blackmagic – JHL6340 Thunderbolt

Write: 851.6MB/s, Read: 1479.5MB/s

Amorphous – ASM2362 USB 3.1

Write: 850.64MB/s, Read: 896.05MB/s

Amorphous – JHL6340 Thunderbolt

Write: 1362.88MB/s, Read: 1575.47MB/s

A note on USB with Mac mini

As described by Apple in the Mac mini specs page, the port you use is important (sorry!).

Two Thunderbolt / USB 4 ports with support for:

  • DisplayPort
  • Thunderbolt 3 (up to 40Gb/s)
  • USB 3.1 Gen 2 (up to 10Gb/s)
  • Thunderbolt 2, HDMI, DVI and VGA supported using adapters (sold separately)

Two USB-A ports (up to 5Gb/s)
HDMI 2.0 port
Gigabit Ethernet port
3.5mm headphone jack

The USB-A ports only support up to 5Gb/s which means whether you are using a USB 3.1 enclosure or a Thunderbolt enclosure you need to connect it to one of the “Thunderbolt / USB 4” ports to achieve 10-40Gb/s. I did verify with a speed test, and you can only achieve circa 500MB/s with a USB-A port (and in fact macOS tells you the connection speed in System Information).

Tagged with:
Dec 23

I recently purchased a new Mac mini to replace my home computer – a 2009 iMac. It was well overdue as Apple listed it as obsolete 4 years ago.

Unfortunately, it only comes with 256GB SSD storage as standard and Apple charges £200 extra for 512GB and £400 extra for 1TB. Very pricey! So in an attempt to save some money, I thought I would use an external drive for additional space.

It wasn’t long before I settled on the idea of getting an NVMe SSD with an enclosure. This was recommended by The Verge and seemed to offer the best price point and flexibility.

For the SSD itself, I went through several sites such as Tom’s Hardware looking for a recommendation and eventually settled on the ADATA XPG SX8200 Pro. This offered a good price/performance ratio (at least in the UK).

Now came the more tricky part – which enclose to use. Originally, I was expecting to get a Thunderbolt enclosure, but it turns out they are prohibitively expensive – especially for my use-case. It didn’t make sense to spend more on the caddy than the SSD!

After trawling Amazon for a while I picked up a FIDECO M.2 NVME External SSD Enclosure. It looked very promising – 4.3 out of 5 starts with 782 ratings.

However, as soon as it arrived – the fun started. While I did manage to connect and initialise the disk, immediately after starting a file transfer it detached itself from the OS. I tried disconnecting and reconnecting it, but it showed up uninitialised as a 97.86TB disk.

I thought I’d try formatting it again, but I ended up with the following error:

Unable to write to the last block of the device. : (-69760)

This makes sense, given how big it thought the disk is (over 90TB), and how big it actually is (1TB).

At this point, I started researching enclosures and looking around to if others had similar problems. It turns out NVMe enclosures are notoriously flakey and there are many forums threads discussing the topic.

What I found is, for all the off-brand enclosures, there are three actual chips that power them:

  1. JMS583
  2. RTL9210(B)
  3. ASM2362

Without knowing ahead of time, it seems the enclosure I first bought contained a RTL9210B. This does not have a lot of complaints, but it certainly didn’t work for me. I even tried upgrading the firmware to no avail.

So with that in mind, I scoured Amazon for a new enclosure with a different chipset. Specifically an ASM2362 as the JMicron chip has lots of negative comments.

A few days later (no, I don’t have Prime) my Kafuty USB3.1 to M.2 NVME External Hard Drive Enclosure arrived and I swapped over the SSD.

It immediately showed up in Finder but I thought I’d reinitialise it anyway. Some file transfers and speed-tests later, all was still good ?

TLDR; On my M1 Mac mini, RTL9210B was a complete failure and ASM2362 is stable.

Tagged with:
Jan 05

To briefly re-cap my last post, I recently upgraded my home cinema speakers to the new MK Sound M-Series:

  • 3 x M&K Sound M70 – Left/Centre/Right
  • 1 x M&K Sound M40T – Surround Pair
  • 1 x M&K Sound V10 – Subwoofer

So as promised, here is my “review” 1 of the system.

Unboxing

M&K speakers are packaged very well in polystyrene. There is nothing much more to say about the unboxing, other than what’s inside the boxes.

M&K Speakers Boxes

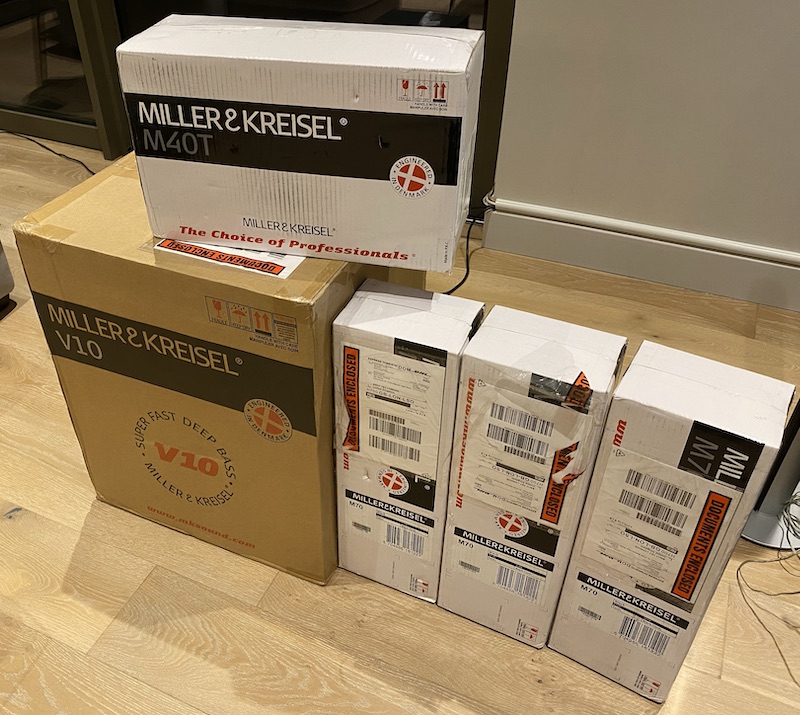
The last thing I expected to find when opening a speaker box was a pair of gloves. That’s right, M&K speakers all come with a pair of white butlers gloves! This is presumably to encourage handling them with care and ensuring you do not get any fingerprints on the perfect finish. I would say to take extra care if you do use the gloves, as the speakers are very slippery in your hand with them on.

Aesthetics

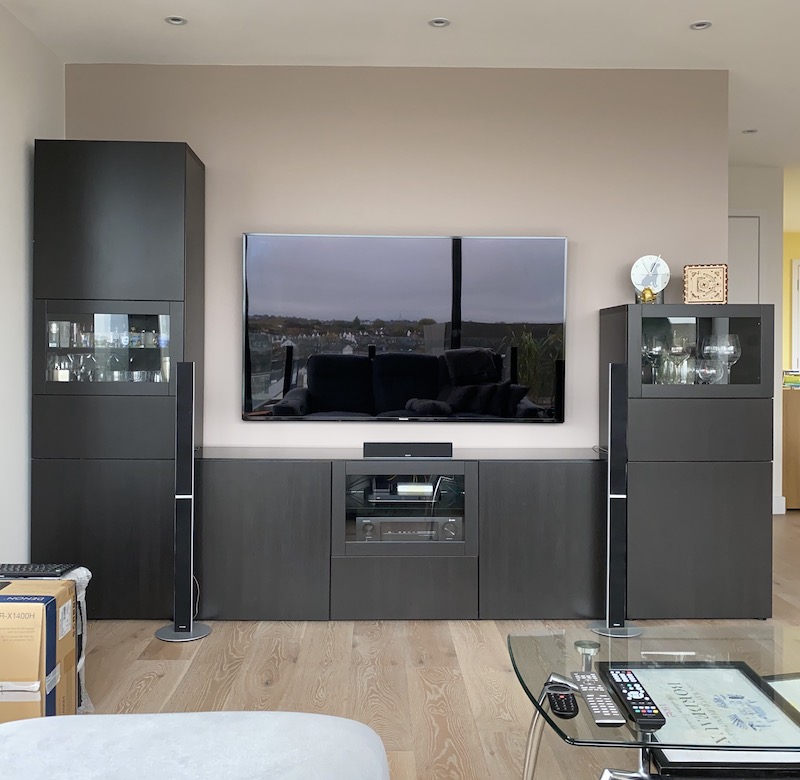
These speakers are absolutely brilliantly made. They are completely solid with no seams or joins in the cabinet, complete with rounded edges and corners. It feels akin to the unibody MacBook Pro.

When I say they completely smooth – they are. There aren’t even mounting holes for the speaker grille, but guess what? You don’t need any! Bring the grille into position and it snaps into place using magnets. Very Apple-esque.

Note, this is only true of the M-Series so perhaps could be a new feature. The V10 sub still has mounting holes for the grille.

Mounting

The M-Series is designed to be wall-mounted and, as can be seen from the manufacturer’s pictures, there are keyhole fixings on the rear for vertical or horizontal positioning. Each came with a set of screws and rawlplugs, however I chose to use my own, heavier-duty ones to ensure a safe fixing in plasterboard.

Mounting the surrounds on the ceiling was a little more tricky as, again, they’re designed to be wall-mounted. In the end, I found an appropriate set of little speaker mounts for a great price.

Sanus tilt and swivel universal speaker mount white (available at Screwfix and Richer Sounds). Note, they are sold as a pair – you don’t need to buy two!

I had to drill holes in them to align with the holes in the M40T, which was only possible on the diagonal. Still, very straightforward and then just popped in some longer M4 screws.

Ceiling Speaker Bracket

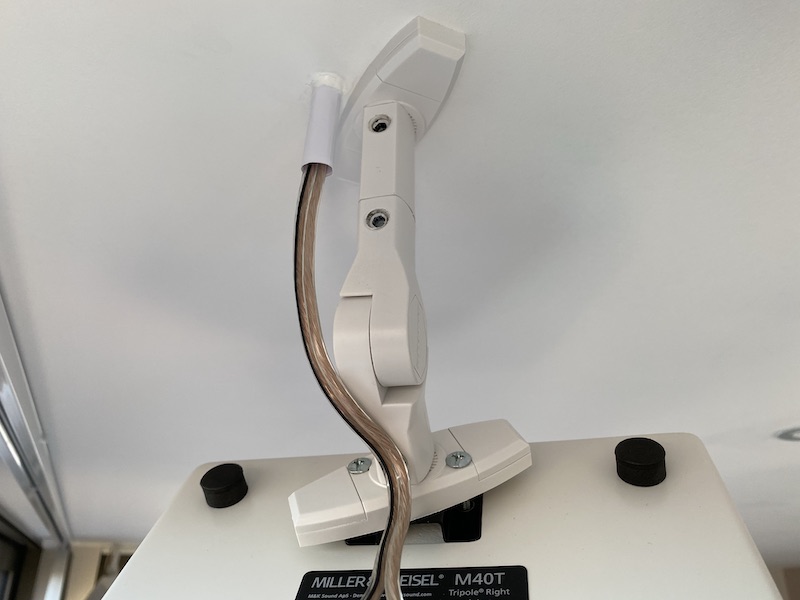
Note, I only left the keyhole fixing in to act as a spacer because the screws I had lying around with the correct thread were too long. I don’t mind – it’s a good way not to lose them for the event I want to mount them on a wall one day!

Setup

The M-Series doesn’t have anything to set-up – there are no controls on them. The V-10 subwoofer on the other-hand, has a 16 page manual (available as a download from the MK Sound website).

To summarise, set the crossover to bypass, phase to zero and volume to 12 o’clock. One other note on the V-10 is that is didn’t come with a UK power-cord (just US and EU). This didn’t bother me as I had already pre-wired an extension for the sub-location, but who doesn’t have a spare IEC lead lying around, anyway?

Then it was a simple case of (re-)auto-calibrating my AV receiver. This is a straightforward process of measuring the sound with a provided microphone from the listening position (and several around it).

The other adjustments I made were:

  • Set the subwoofer mode to LFE + main
    The low range signal of all channels is added to the LFE signal output from the subwoofer
  • Increase and unify the crossover to 110Hz
    (was calibrated at 90-100Hz)
  • Increase the LPF to 120Hz
    Set LFE signal playback range. Changes the playback frequency (low pass filter point) of the subwoofer.
  • Turn the sub volume control up slightly so the base sounded more in-balance.

Sound

It didn’t take long to be blown-away with the sound quality. As soon as you plug in these speakers, they just work. No faffing.

The speakers are incredibly clear and immersive. With my pervious setup, I was using options like “Dolby Surround Upmix”, “Center Spread” and increased “Dialog Level”. None of these are needed (nor improve) the MK loudspeakers.

Across the front, the sound is incredibly “complete”. There are no missing areas and there is a very smooth transition between locations. You can hear every detail without increasing the volume which (perhaps negatively) shows up the imperfections in recordings and bad mixes.

Speaking of smooth transitions, the subwoofer blends seamlessly into the rest of the sound. There is no “this is where the satellites end and this is where the subwoofer starts”. With my previous system, it was very obvious when the sub was turned off, not only because the satellites were weaker, but because the base was very isolated. Complete opposite with the M&K package. The base is powerful when called for (you can really feel it) and supports the satellites for great depth the rest of the time.

As for the rears, the tripole M40Ts fit into a 5.1 system very nicely. They make you feel as though you’re “inside” the sound, without drawing attention to where the speakers are. When there are direct sound effects at the back – you notice, other than that – they just enhance immersion.

Overall

From the unboxing and installation, through to the listening experience and looking at them every day, I am completely satisfied with my M-Series 5.1 package choice. I was looking for an accurate sound that fills the room for a respectable budget. All of my expectations have been met and some surpassed.

For what I got, and what I paid, I couldn’t ask for more. Having said that, after using the system for a month I am perhaps more aware of the limitations of a 5.1 system. While the front is very “full” and the surrounds create immersion, the transition between them and the elevated position of the rears highlight a place for additional speakers (think 7.1, Atmos, etc).

Given this set-up is in my open-plan living space and I have a distinct lack of lossless and multi-channel (> 6) sources to start with, I shall restraint from going further down that path for the moment.

However, one thing I must do is upgrade my AVR to do the M&K speakers justice. Not only for cleaner amplification and power, but I’m sure I would benefit from advanced room correction. One for later in the year when I have the time and budget…

1 “review” I use quotation marks because I am not really qualified to review speakers – I’m not an expert, I do not have the correct room environment / AVR / measuring equipment to be scientific, and I have not listened to anything comparable recently. The speakers were bought entirely on recommendation and I most likely have a form of post-purchase confirmation bias.

Tagged with:
Dec 21

After moving into my new home, I found the 5.1 speaker package I’ve had since uni wasn’t up to the task of filling the larger living room. This came as no surprise, and I’d been looking for an excuse to upgrade for quite a while anyway.

The hunt was now on to find something appropriate for my living space which also didn’t cost the earth. Given the size of my TV (65″) and TV unit, I had a bit of a restriction as to what would fit. You can see what I mean in the picture below.

Living Room TV

Floor-standers were out of the question, and crucially the height for the centre-speaker was also limited (to around ~13cm). Left and right channels had ~17cm of space which is fair enough.

Not being an avid follower of the home cinema scene, I headed over to AVForums for advice. They have a dedicated sub-forum “What Speakers Should I Buy?” where I duly posted my room restrictions and budget.

The shortlist came down these, with a strong recommendation for the MK sound-bar.

  • Kef T-Series
  • M&K Sound Bar
  • Monitor Audio Apex

However, while browsing the MK Sound website, I noticed some on-wall speakers that also seemed appropriate (similar to the Kef T-Series). After enquiring it turned out they were not recommended as the were discontinued and being replaced by new models which weren’t available yet.

I did eventually get details and prices on the new M-Series range, and given the sizes worked out perfectly, and they were just about in-budget – I picked out the following package:

  • 3 x M&K Sound M70 – Left/Centre/Right (black)
  • 1 x M&K Sound M40T – Surround Pair (white)
  • 1 x M&K Sound V10 – Subwoofer (black)

Miller & Kreisel are well-known for professional, accurate speakers and in fact have become the reference standard in the finest music and film studios. I was told they have stunning sound for the price-point and given they’re not cheap, my expectations were well up-there.

I went for white surrounds as I had been researching best speaker placement and decided to ceiling-mount them. This was not only a “better” position, but also greatly aided tidy wire-management as I could run them inside the ceiling rather than along the floor. Here is an excerpt from the M&K Sound Satellite Operation Manual:

The surround speakers should be located relatively close to the ceiling. Placement above the listeners’ heads is important, preferably with the cabinet’s bottom at least two feet (60 cm) above a seated listener’s head.

Being a new model, it took a good three weeks to get my hands on them after making the decision and I can thank Rich at SeriouslyCinema for getting them to me as soon as possible.

Read my review of these speakers in my next post.

Tagged with:
Feb 18

I have been maintaining my own SVN server for many years, but in order to share code and make use of managed services, it was time to migrate some of my repositories to Git.

There are many tutorials for svn-git migration, here’s a customised script which works for me: migrate-svn-to-git.sh. Note, it requires an authors.txt file – there any plenty of adequate resources out there for how to create one.

There is nothing specific about this script for Google Source Repos, that is just my choice for private code so it can make use of Google Cloud Build and gcr.io.

#!/usr/bin/env bash

svnUri="$1"
gitUri="$2"

if [[ -z "${svnUri}" || -z "${gitUri}" ]]
; then
echo "[ERROR] Usage migrate-svn-to-git.sh <svn_uri> <git_uri>" 1>&2
exit 1
fi

if [[
! -f authors.txt ]]; then
echo "[ERROR] authors.txt is missing" 1>&2
exit 1
fi

echo "[INFO] Cloning from SVN: ${svnUri}"
git svn --authors-file=authors.txt clone -s ${svnUri} --prefix svn/ migration
cd migration

echo "[INFO] Creating Git tags"
for
t in $(git for-each-ref --format='%(refname:short)' refs/remotes/svn/tags); do git tag $(echo ${t} | sed 's^svn/tags/^^') ${t} && git branch -D -r ${t}; done
echo "[INFO] Creating Git branches"
for
b in $(git for-each-ref --format='%(refname:short)' refs/remotes/svn | grep -v trunk); do git branch $(echo ${b} | sed 's^svn/^^') refs/remotes/${b} && git branch -D -r ${b}; done

echo "[INFO] Creating .gitignore file"
git svn show-ignore > .gitignore
git add .gitignore
git commit -m "Added .gitignore"

echo "[INFO] Pushing to Git: ${gitUri}"
git remote add google ${gitUri}
git push --force google --tags
git push --force google --all

cd -

echo "[INFO] Removing migration directory"
rm -rf migration

Once you have created the Git repo, you need to switch your working copy of a project from SVN to Git. Here’s a script: switch-svn-to-git.sh

#!/usr/bin/env bash

gitUri="$1"

if [[ -z "${gitUri}" ]]
; then
echo "[ERROR] Usage switch-svn-to-git.sh <git_uri>" 1>&2
exit 1
fi

if [[
! -d .svn ]]; then
echo "[ERROR] Not a SVN project" 1>&2
exit 1
fi

echo "[INFO] Finding current branch"
svnBranch=$(svn info | grep '^URL:' | egrep -o '(tags|branches)/[^/]+|trunk' | egrep -o '[^/]+$')
echo "[DEBUG] ${svnBranch}"

echo "[INFO] Cleaning SVN directory"
rm -rf .svn

echo "[INFO] Initialising Git from: ${gitUri}"
git init
git remote add origin ${gitUri}
git fetch

echo "[INFO] Saving working copy"
git show origin/master:.gitignore > .gitignore
git checkout -b tmp
git add .
git commit -m "local changes"

echo "[INFO] Checking out branch"
gitBranch="master"
if [[ $
{svnBranch} != "trunk" ]]; then
gitBranch="${svnBranch}"
fi
git checkout ${gitBranch}

echo "[INFO] Merging working copy"
git merge --allow-unrelated-histories -X theirs --squash tmp
git branch --delete --force tmp

echo "[INFO] Deleting IntelliJ reference to SVN (if exists)"
test -f .idea/vcs.xml && rm .idea/vcs.xml

echo "[INFO] Done - you may want to set your name / email with: git config user.email <email>"
Mar 25

Having upgraded to a UHD TV last year, it was time to get a new AV receiver to match. It’s been a long time since I was in the AVR market and a lot has changed.

After doing the research at the end of last year, I thought I’d share the take-aways in this how-to guide.

Since I got my first AVR, two sets of HD codecs became commonly available. The first set, mainly used on Blu-ray are:

  • DTS-HD Master Audio
  • Dolby TrueHD

These are very well supported now so you don’t need to worry whether an AVR will be able to decode them.

The more recent set, most likely to be found on 4K Blu-rays consist of:

  • DTS:X
  • Dolby Atmos

Dolby Atmos is actually fairly commonly available, e.g. BT Sport, Sky Q (Sport and Cinema) and Netflix, so it’s important to ensure your AVR will support these latest codecs if you want any kind of future-proofing.

They are now fairly well established so it’s not too difficult to find support.

The last thing to mention about audio is eARC. This is the Enhanced Audio Return Channel finalized in the 2.1 HDMI spec. It allows the newer high definition codes, such as Dolby Atmos and DTS:X to be passed back from the TV to your AVR. If you really want to future-proof, consider this feature. Personally, I don’t find it necessary – all my equipment is attached to the TV through the AVR so there is little reason to send the sound back. The obvious exception to this is when you have a smart TV that you use for streaming Netflix or other services. Since regular ARC supports the first generation high definition codecs, just not the new “3D” ones, I’m happy to live with that – especially since I don’t have a TV that supports it!

ARC is important, but common enough that you don’t need to look out for it.

Now for video – there are basically two things you need to look out for.

Firstly, HDMI 4k Ultra HD 60Hz with HDCP 2.2 compatibility. This is essential but not too difficult to find on recent models.

Secondly, and a little more obscure is HLG. Standing for Hybrid Log Gamma, this is the HDR format conceived by the BBC and NHK which will most likely be used by broadcasters in the UK (BBC / iPlayer, Sky Q). There is little content right now, but if you want to see HDR content in the future, you’d better make sure your AVR has HDR pass-through (HDR10, Dolby Vision and HLG).

I ended up choosing the Denon AVR-X1400H. This was a good combination of minimum requirements, price and number of HDMI inputs.

You can find my comparison / shortlist here, though the pricing and models will start to get out of date quite quickly.

Dec 03

While migrating one of my hobby projects from the PHP mysql extension to PDO, I came across this error:

PHP Fatal error:  Uncaught exception 'PDOException' with message 'SQLSTATE[HY000]: General error: 2014 Cannot execute queries while other unbuffered queries are active.  Consider using PDOStatement::fetchAll().  Alternatively, if your code is only ever going to run against mysql, you may enable query buffering by setting the PDO::MYSQL_ATTR_USE_BUFFERED_QUERY attribute.'

A quick search on the web suggested this happens when you don’t fetch all rows from a query. I knew this wasn’t the case and didn’t want to just enable the buffered query attribute as I felt something else was wrong.

Turns out this problem came about as I was trying to migrate my MySQL connection properties, previously defined with:

[code lang=”php”]define(‘UTC_OFFSET’, date(‘P’));
mysql_query(“SET time_zone='” . UTC_OFFSET . “‘;”);
mysql_query(“SET NAMES ‘utf8’ COLLATE ‘utf8_general_ci;'”);[/code]

The natural change was to add these two statements to PDO::MYSQL_ATTR_INIT_COMMAND (separated by a semicolon). However, that’s where the problem is. The SET command allows both to be specified at once, hence the right way of doing it is:

[code lang=”php”]PDO::MYSQL_ATTR_INIT_COMMAND => “SET NAMES ‘utf8’ COLLATE ‘utf8_general_ci’, time_zone = ‘” . UTC_OFFSET . “‘”[/code]

Credit: Stack Overflow

Bonus: Setting the timezone with a UTC offset allows you to use a zone that PHP knows about, but the MySQL server doesn’t. That way it can be set with the ini setting date.timezone or date_default_timezone_set and doesn’t need to be modified in two places if it needs to be changed.

preload preload preload