Oct 02

After upgrading to FreeBSD 9.3, my custom postfix installation was overwritten with postfix-current-3.2.20160925,4. This caused the following entry in my maillog:


Oct 2 19:55:04 myhostname postfix/master[1481]: warning: process /usr/local/libexec/postfix/smtp pid 90855 exit status 1
Oct 2 19:55:04 myhostname postfix/master[1481]: warning: /usr/local/libexec/postfix/smtp: bad command startup -- throttling
Oct 2 19:56:04 myhostname postfix/smtp[90864]: warning: unsupported SASL client implementation: cyrus
Oct 2 19:56:04 myhostname postfix/smtp[90864]: fatal: SASL library initialization

Luckily it was a quick fix as the previous bug has been fixed.

$ sudo pkg install postfix-current-sasl

This will uninstall postfix-current and install a version with sasl support which can be verified as follows:

$ postconf -a
cyrus
dovecot

Jan 26

Ever tried sending mail from your own server and ended up on the Spamhaus Policy Block List (PBL)? I have, a couple of times.

From my FreeBSD sever, I get daily emails; “daily run output” and “security run output”. I’m not particularly interested in these, but it’s important that I get SMART notifications.

What I noticed is that whenever my IP address changes (every couple of months) the emails start coming through again. If you look at the mail log (/var/log/maillog), you’ll see something like
Dec 24 03:14:24 myhostname postfix/smtp[6740]: 9B8A5CB111C: to=<user@example.com>, orig_to=<user>, relay=smtp.examplehost.net[x.x.x.x]:25, delay=43, delays=0/0.22/21/21, dsn=5.0.0, status=bounced (host smtp.examplehost.net[x.x.x.x] said: 550-"JunkMail rejected - me.exampleisp.com (myhostname.mydomain.net) 550-[x.x.x.x]:63909 is in an RBL, see 550 https://www.spamhaus.org/query/ip/x.x.x.x" (in reply to RCPT TO command))

So nicely, they’ve given a link to lookup why you’re blocked. In my case it’s due to using an unauthenticated mail port (25). Since I had this problem before, I though I had setup authentication but in the FAQ it’s very clear that you cannot get this error if you have authentication enabled.

So what else does does it say in the mail log? Well, just before that line:
Dec 24 03:13:54 myhostname postfix/smtp[6753]: warning: smtp_sasl_auth_enable is true, but SASL support is not compiled in

This is a problem with the Postfix package for FreeBSD. I can’t find any other way around it other than to compile Postfix yourself from Ports. Here’s a link to the (unresolved) request in FreeBSD Bugzilla to add a package with it compiled in. So if you’re looking for a FreeBSD package with SMTP SASL authentication – give up (unless that bug has been resolved since the time of posting).

I’m not going to go into details of how to set up the SMTP + SASL on FreeBSD, there are already many guides that do that. I found these helpful:

One other small roadblock I ran into was trying to use port 465. When checking my web host, they specify that port of authenticated SSL, but I found the following error in the logs:
CLIENT wrappermode (port smtps/465) is unimplemented
instead, send to (port submission/587) with STARTTLS
status=deferred (lost connection with smtp.examplehost.net[x.x.x.x] while receiving the initial server greeting

My host didn’t give any indication that it supported SMTP on port 587 and if you search for this problem on the web you’ll find many people trying to solve it with stunnel. A quick telnet to my host on 587 showed it was open, so I just gave it a try. Lo and behold Postfix authenticated and sent my mail. So give port 587 a try even if you’re recommended to use 465 for your relayhost provider.

Dec 25

It’s Christmas time, which is when I get a chance to upgrade my home servers. This year one of them needed a double-upgrade: 14.10 to 15.04 to 15.10.

After backing-up (which is essentially a tar command, more on that in another post), I proceeded with the first upgrade.

Everything seemed to go smoothly but on boot, the system dropped into an emergency mode shell.

At least it showed a couple of errors:

  1. acpi pcc probe failed
  2. error getting authority error initializing authority

After a quick search, I found that the first is actually just a warning and can be ignored (source). If I had more time, I would consider fixing the root cause.

The second one was a little more tricky. The error doesn’t really indicate the real problem but a few people have found it to be caused by an invalid fstab entry.

In the recovery shell, run the following command to find which one (thanks):

[code lang=”bash”]journalctl -xb[/code]

For most people, it’s due to having a UUID specified that no longer exists (either due to reformatting a drive or removing the disk all together). In my case it was because I had several tmpfs mounts which are no longer allowed:

tmpfs           /tmp           tmpfs   defaults,noatime           0 0
tmpfs           /var/lock      tmpfs   defaults,noatime           0 0
tmpfs           /var/run       tmpfs   defaults,noatime           0 0
tmpfs           /var/tmp       tmpfs   defaults,noatime           0 0


The error can be alleviated either by adding nofail to the options or just removing / commenting out the mount.

The reason I used a tmpfs (RAM disk) for /tmp and others was when I originally set up this server (and some others) the boot disk was an 8GB CompactFlash card. Temp files would create undesirable wear on the device but I’ve since moved this system to an SSD so that’s not an issue anymore. Hence, I just deleted the entries.

Dec 30

Over the holidays, I rebuild my CCTV server. Rather than trying to reuse the installation from the previous disk, I thought it’d be easier just to install everything fresh. Hence, I followed the instructions on the ZoneMinder Wiki.

Following on from this rebuild, I was tidying up my custom viewers which had hard-coded monitor IDs. Of course the correct way to do this would be via an API. Is there an API in ZoneMinder? Well according to the “latest” docs, it should be included since 1.27.

[code lang=”bash”]curl http://wiggum/zm/api/monitors.json
…404 Not Found…[/code]

So I checked if it was actually there or not:

[code lang=”bash”]iain@wiggum:~$ ls /usr/share/zoneminder/
ajax  cgi-bin  css  db  events  graphics  images  includes  index.php  js  lang  skins  sounds  temp  tools  views[/code]

Nope.

Not sure why it’s not there, you can see it on GitHub, but here’s how I solved it until the package is updated properly. (I’m omitting the use of sudo where needed.)

[code lang=”bash”]cd /usr/src
git clone https://github.com/ZoneMinder/ZoneMinder.git –branch release-1.28 zoneminder-1.28
mkdir zoneminder-1.28/web/api/app/tmp
chown www-data:www-data zoneminder-1.28/web/api/app/tmp[/code]

[code lang=”bash”]vi zoneminder-1.28/web/api/.htaccess[/code]
Add: RewriteBase /zm/api

[code lang=”bash”]vi zoneminder-1.28/web/api/app/webroot/.htaccess[/code]
Add: RewriteBase /zm/api

[code lang=”bash”]cd zoneminder-1.28/web/api/app/Config/
cp core.php.default core.php
cp database.php.default database.php
vi database.php[/code]
Change the database settings (host, login, database, password) to match: /etc/zm/zm.conf

[code lang=”bash”]vi /etc/apache2/conf-available/zoneminder-api.conf[/code]
Add the following:
[code]Alias /zm/api /usr/src/zoneminder-1.28/web/api
<Directory /usr/src/zoneminder-1.28/web/api>
Options Indexes FollowSymLinks
AllowOverride All
Require all granted
</Directory>[/code]

Enable the conf, restart apache and you’re done:
[code lang=”bash”]a2enconf zoneminder-api
apachectl graceful[/code]

Don’t forget to enable mod_rewrite if it isn’t already:
[code lang=”bash”]a2enmod rewrite[/code]

Jan 23

We already know we’re using one of those eBuyer value cases as a starting point. The first thing to do was strip out all the internals – we just needed the bare case. It was pretty simple to dismantle as almost all of it unscrewed.

Next, the reinforcement I mentioned in the previous post. This was a 3mm x 25mm steel strip which was cut and epoxied to the bottom. Strategically placed, they raise the PMPs off the bottom slightly. Combined with 20mm standsoffs there is enough space for the connectors underneath. Those are just standard PC-modder parts wired together as specified in the diagram from the last post.

The drives are not screwed in, they just rest there – connectors down. To prevent them from falling over, there is a grid at the top. This was made by combining 1mm x 3mm steel strips with some dowels. Strangely, the dowel of this size was difficult to find at a reasonable price, so we ended up using 2mm diameter polyester fibreglass rods. For vibration dampening, the only thing is rubber washers securing the PMPs.

Holes in the front for the fans and the case is complete (almost). Unnecessary, but for the cool factor we wired up LEDs for each drive. The PMPs come with pin outs for the PMP status as well as each drive. Quite a lot of effort to connect so many LEDs (the right way round), but a good indicator when switching on the case.

Feb 05

Recently I upgraded one of my servers from Ubutnu Server 11.10 to 12.10 (via 12.04). Unfortunteatley, this broke AFP.

When connecting, I got the error “Something wrong with the volume’s CNID DB“.

I’m pretty sure I’ve had this error before, but the standard fix of  deleting .AppleDB didn’t work.

After reading a few more up-to-date tutorials and verifying my configurations, I finally sussed it.

[code lang=”bash”]root@burns:/home/iain# dbd
dbd: error while loading shared libraries: libdb-4.8.so: cannot open shared object file: No such file or directory[/code]

So I checked to see if I had this anywhere.

[code lang=”bash”]root@burns:/home/iain# locate libdb-4.8[/code]

No results.

[code lang=”bash”]root@burns:/home/iain# locate libdb

/var/cache/apt/archives/libdb4.8_4.8.30-11ubuntu1_amd64.deb
…[/code]

That was handy, so I installed it.

[code lang=”bash”]root@burns:/home/iain# dpkg -i /var/cache/apt/archives/libdb4.8_4.8.30-11ubuntu1_amd64.deb
Selecting previously unselected package libdb4.8:amd64.
(Reading database … 196079 files and directories currently installed.)
Unpacking libdb4.8:amd64 (from …/libdb4.8_4.8.30-11ubuntu1_amd64.deb) …
Setting up libdb4.8:amd64 (4.8.30-11ubuntu1) …
Processing triggers for libc-bin …
ldconfig deferred processing now taking place[/code]

And dbd started working.

[code lang=”bash”]root@burns:/home/iain# dbd
Usage: dbd [-e|-t|-v|-x] -d [-i] | -s [-c|-n]| -r [-c|-f] | -u

…[/code]

After deleting .AppleDB for good measure and restarting Netatalk, all was well.

I have no idea why this was missing, or whether it is the correct fix but it seems to work without side effects. If you don’t have the .deb, I guess this would also work:

[code lang=”bash”]apt-get install libdb4.8[/code]

May 29

First and foremost, I want to thank my friend Mat for helping with the design. I couldn’t have done it without you!

As you will recall from part IV, I had a second 4U case used only to house drives. This was the starting point for my NAS server 2, case #2. I would have one case for the host system (and some drives) and a second case just for drives.

If you look at the Backblaze design, you’ll see it has space for a motherboard, 2 PSUs and 46 drives (1 is for the host OS). That’s an awful lot to squeeze into a single case! It works for them as they are racked up in a data centre with deep racks. Something would have to give in my 545mm deep ‘value’ case.

Fourty-five drives is a nice number, as it gives you 3 x 15 drive arrays. I think that’s the most it’s sensible to have in a RAID 6 configuration. Fitting up-to 11 drives in the first case, I needed to cram at least 34 in case #2.

Having verified SATA port multipliers work perfectly well, I was happy to take the same approach as Backblaze with their backplanes. What I decided to think about a bit for carefully than them was the host SATA ports. They put 20 drives on the PCI bus, but I knew from experience this would degrade performance.

Since I already had a 4-port PCIe card, it made sense to use that for 4 port-multipliers. This would give me 20 ports on a PCIe x4 bus – the drives won’t all operate at maximum speed at the same time, but there’s still plenty enough throughput to saturate a gigabit LAN. This puts the SATA port count at 26 so far. Looking for 45 in total, I would need another 19. The only practical way to do this, based on the number of PCIe slots I had was another 4-port card each hosting a 5-port multiplier/backplane. So instead of cramming one standalone port-multiplier and associated drives in the main case, we decided to put them all in case #2.

Spanning power between cases didn’t seem like the best idea, and with 40 drives now needing to be catered for, 2 PSUs had to fit in the second case. Here’s a bird’s-eye and front on view of the layout. Thanks again, Mat, for coming up with it.
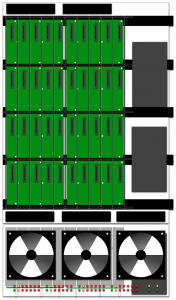
The black bars going left-to-right are for reinforcement – 40 hard drives weigh a lot! The other thing to note is the orientation of the drives. Keeping them that way allows efficient air-flow, from front to back.

The original intention for my 1000W PSU was to power the whole system and 22 drives. Since I’m now trying to support up to 45 drives and keep the power in each case separate, the power arrangements needed to be rethought.

I allocated the OCZ PSU to case #2 and re-purposed an old PSU I had for the main system. I calculated the amperage available for each voltage sufficient to supply 5 of the 8 port-multipliers. Maybe it would have been ‘neater’ to split it four and four, but this way, when upgrading, I wouldn’t need such a beefy supply.

Each backplane requires two molex feeds. Here’s a wiring diagram (credit once again to Mat).
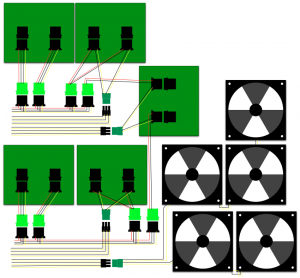
Now we know pretty much what we’re building, in the next post I’ll talk about the parts and construction.

Jun 25

Most likely I found it on Engadget, but it did crop-up in quite a few other places. I am of course talking about the Backblaze blog post Petabytes on a budget: How to build cheap cloud storage.

When I found this, I thought it was fantastic – 45 drives and a host in a single case. If anything was ever going to be perfect for me, this was it!

In the first post, Backblaze were kind enough to detail all the parts used and make available a 3D model of the enclosure. This was great for the community, but in a follow-up post they directed readers as to where they could order the enclosure from directly – Protocase.

As their website directed, I emailed them straight off to get a quote. $872 – wow, way more than I was expecting. On top of this, it would have to be shipped from Canada, adding to the price substantially. Dismayed with that outcome, I thought it was the end of the matter, but Protocase emailed me a few days later asking for feedback.

As you do (or at least as I do), I replied with a 250 word rant as to how expensive it was compared to products such as the Norco RPC-4020, which was a mete $280. It must have be somewhat interesting, as I got an even longer reply direct from the Chairman addressing each of my points.

Needless to say, I didn’t go forward and purchase one of these cases, instead using the concept to design my own.

In my next post I will talk about the design along with how and why it differs from the Backblaze storage pod.

May 28

Wow, sorry for neglecting this series for so long – I got distracted by being employed! Hopefully, it’s not so long that I’ve forgotten my trail of thought.

So at the end of my last post, I had four 1.5TB hard drives in RAID 6. That would have been around December 2008, but come January 2009, I was out of space and needed to add some more. This was easy; I had 11 bays in the case, and six on-board SATA ports – I just added two drives and connected them straight up. This gave me another 3TB of useable space without any hassle.

In June 2009 I needed to upgrade again, but this time, things were a little trickier. I had no on-board ports left so had to decide how to expand. The original intention was to use 8-port PCIe cards; with space for two of these, I’d have ended up with a 22 drive maximum.

Now, I’m not sure exactly what my thought process was at the time (don’t forget this was two years ago) but I probably decided 8-port cards were either too expensive, or just wouldn’t get me enough ports in total. I ended up getting a 4-port card and four hard-drives to go with it. Great, another 6TB in the array and I was happy until October.

So what did I do next? I’d used 10 out of my 11 bays and had no more SATA ports left. [Probably] being desperate for space,  I just ordered another of the 4U cases that hold 11 drives. Seeing as how my 4-port PCIe card supported them, the cheapest way to get extra SATA ports was to use a SATA port-multiplier. I gave it a go and £40 got me 5 ports, but obviously I had to sacrifice one from the PCIe card.

The PMP was very successful, although I did have to disable NCQ to get it stable. This isn’t necessary anymore, so I won’t go into any further detail. Just to keep track, at the end of October 2009 I had 12 x 1.5TB drives in my RAID 6 array.

In the next installment, I’ll explain where the insparation came from.

Feb 14

Having filled up my first RAID volume, I had to add a new mount and symlink the extra directories into the network share point.

This worked absolutely fine for AFP, but when accessing the share in Windows via SMB, the symlinked folders were inaccessible. Fortunately, there is a simple solution.

Just add this to the [global] section of your /etc/samba/smb.conf.

[code lang=”bash”]follow symlinks = yes
wide links = yes
unix extensions = no[/code]

There are apparently security considerations why this is disabled in the first place, but nothing I (think I) need to worry about.

preload preload preload